
If you’ve been hearing a lot about AI agents lately — you’re not alone. Microsoft has been steadily rolling out AI-powered features across the Microsoft 365 ecosystem, and SharePoint is no exception. SharePoint Agents are one of the most exciting additions to hit SharePoint sites, and the best part? You don’t need to be a developer or IT pro to use them.
In this post, we’ll break down what SharePoint Agents are, how any site owner can manage them, and what steps you’ll take to approve agents or set one as the default for your site. Whether you’re a teacher managing a class intranet, a school administrator running a staff communication hub, or just someone curious about what AI can do inside SharePoint — this one’s for you.
So… What Is a SharePoint Agent?
Think of a SharePoint Agent as an AI-powered assistant that lives directly inside your SharePoint site. It can answer questions, surface content, and help users navigate the information stored in that site — all through a simple chat interface.
Every SharePoint site comes with a built-in, ready-made agent right out of the box. But site members can also create their own custom agents tailored to specific topics, documents, or tasks. For example, a school might have one agent focused on IT support policies and another dedicated to curriculum resources — all living within the same SharePoint site.
Here’s the important part: as a site owner, you have control over which agents are visible, approved, and set as the default experience for your visitors. That’s what this post is all about.
Who Can Do What?
Before diving into the steps, here’s a quick breakdown of permissions:
| Role | What They Can Do |
|---|---|
| Site Members | Create, edit, and share agents |
| Site Owners | All of the above + approve agents and set a default agent |
| Site Visitors | Use agents in the chat pane |
How to Approve an Agent
When a site member creates a custom agent, it doesn’t automatically become visible to all site visitors. As a site owner, you get to review it and approve it — which makes it consistently available to everyone who visits the site.
Here’s how to do it:
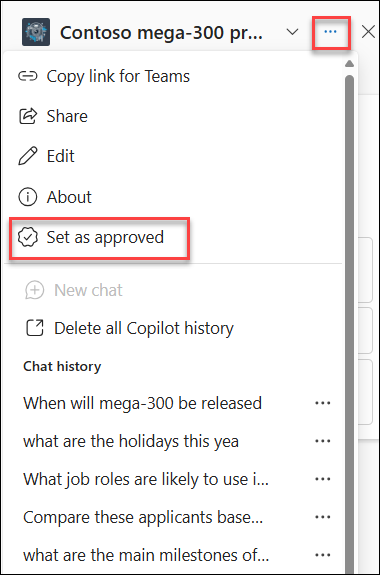
Step 1: Open the agent picker on your SharePoint site (this is the chat/agent panel).
Step 2: Find the agent you want to approve. Select the ellipsis (⋯) — the three dots — next to the agent name.
Step 3: Select “Set as approved” from the menu.
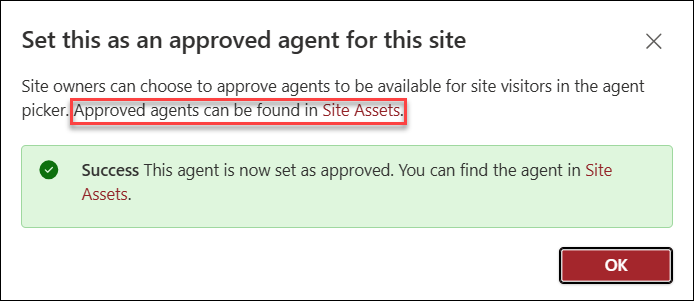
Step 4: A confirmation dialog will appear. Select “Set as an approved agent” to confirm.
Once approved, the agent will be available to all site visitors and can be found under:
Site Assets → Copilots → Approved
That’s it — four steps to give your team or community access to a curated, trusted AI agent right inside SharePoint. 🎉
How to Set an Agent as the Default
Want to make sure visitors are greeted by a specific agent the moment they open the chat pane? You can set any approved agent as the site default.
Here’s how:
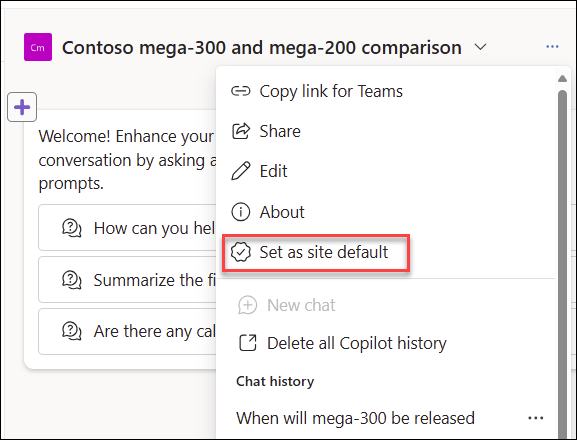
Step 1: In the agent picker, locate the approved agent you want to set as default.
Step 2: Select the ellipsis (⋯) next to the agent.
Step 3: Select “Assign as site default”.
That’s the agent your visitors will see first when they launch the chat pane on your site. Easy!
Pro Tip: The built-in ready-made agent that comes with every SharePoint site is always considered approved and can be reset as the default at any time. So if you ever want to “start fresh,” that option is always there.
How to Delete an Agent
Site members with edit permissions can also delete agents they’ve created — it works just like deleting any other file in SharePoint.
Step 1: Locate the .agent file in your site’s file library.
Step 2: Select the ellipsis (⋯) next to the .agent file.
Step 3: Select Delete.
⚠️ Note: You cannot delete the built-in ready-made agent that comes with your SharePoint site. That one’s here to stay!
How to Monitor Agent Usage
Once agents are live on your site, you might want to keep an eye on how they’re being used. Microsoft has built in a few ways to do this:
- File Statistics — Select an individual .agent file and check the Details pane to see its usage stats.
- Search — Use site Search to find all agents across the site, which is handy for bulk actions.
- Site Usage — Head to Site Usage reports to see which agents are the most popular on your site.
If you’re a SharePoint admin, you also have access to tenant-level monitoring tools to track agent usage across multiple sites.
Why This Matters for Education
For those of us working in education, SharePoint sites often serve as the backbone of communication — whether that’s a staff intranet, a department hub, or a resource portal for students. SharePoint Agents can transform these sites from static repositories into interactive, conversational experiences.
Imagine a parent portal where visitors can ask questions about enrollment policies and get instant answers. Or a teacher resource hub where staff can ask the agent to surface the most recent curriculum guides. The agent handles the heavy lifting — site members don’t have to hunt through folders to find what they need.
And as a site owner, you maintain full control over which agents are running and what experience greets your visitors first. That’s a pretty powerful position to be in.
A Note on Data and Privacy
SharePoint Agents follow the same data privacy and security standards as the rest of Microsoft 365 Copilot. They only surface content that the user already has permission to access — so no worries about agents sharing documents that should stay restricted. For more details, Microsoft’s documentation on Data, Privacy, and Security for Microsoft 365 Copilot is a great resource.
Ready to Get Started?
If you’re a site owner and haven’t explored SharePoint Agents yet, now is a great time to dive in. The steps above are genuinely easy to follow, and the payoff — a smarter, more interactive SharePoint site — is well worth the few minutes it takes to set things up.
Have questions or want to share how you’re using agents on your SharePoint site? Drop a comment below or reach out — we’d love to hear how the NinjaCat community is putting these tools to work!
Tags: #SharePoint #AIAgents #Microsoft365 #EdTech #Copilot #M365 #SharePointAgents #DigitalWorkplace